


Selenium Certification Training Course
- 48k Enrolled Learners
- Weekend/Weekday
- Live Class
(19100)
In this Selenium Tutorial article, I will introduce you to Selenium Webdriver which is the most popularly used automation test framework in today’s market. It is open-sourced and can be used with all the prominent programming languages like Java, Python, C#, Ruby, Perl, etc., for automating the browser activities. Through this article, I will tell you everything you need to know to get started with testing web apps using Selenium WebDriver.
Below are the topics I will be covering in this article on Selenium Tutorial:
This selenium tutorial blog will give you a glimpse of all the important concepts required for Selenium Training.
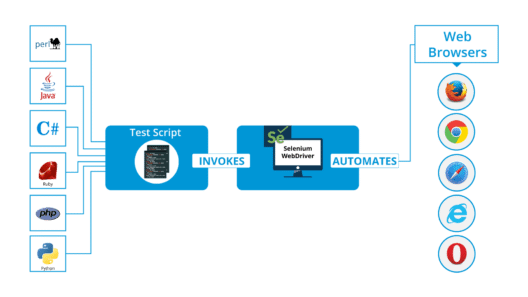
Selenium WebDriver is a web-based automation testing framework that can test web pages initiated on various web browsers and various operating systems. In fact, you also have the freedom to write test scripts in different programming languages like Java, Perl, Python, Ruby, C#, PHP, and JavaScript. Do note that Mozilla Firefox is Selenium WebDriver’s default browser.
But many times, budding testers has this doubt in mind,
To answer this question in very layman terms, I would say, “Yes, it is!”. Selenium is really easy to learn and master as you need to have a basic understanding of any of the prominent programming languages such as Java, C#, Python, Perl, Ruby, PHP. Having prior knowledge of any of these programming languages comes in handy for writing test cases. But in case you don’t have any then worry not. Selenium IDE is a GUI based tool that you can use effectively.
Find out our Selenium Testing Course in Top Cities
Below are a few of the most intriguing uses of Selenium software:
WebDriver was introduced as part of Selenium v2.0. Selenium v1 consisted of only IDE, RC, and Grid. But the major breakthrough in the Selenium project was when WebDriver was developed and introduced as a replacement in Selenium v2. However, with the release of Selenium v3, RC has been deprecated and moved to a legacy package. You can still download and work with RC but, don’t expect any support for it.
In a nutshell, the advantages WebDriver has over RC are:
But the drawback when compared to RC is that the test reports cannot be generated. RC generates detailed reports.
The below image depicts how WebDriver works:
But have you ever wondered why Selenium Webdriver was needed? In the next section of this Selenium Tutorial article, I will discuss the limitations of Selenium RC because that was the reason for the eventual development of WebDriver.
You might be surprised when I say that Selenium RC became an instant hit when it was launched. That was because it overcame the same-origin policy issue which was a major problem while testing web apps with Selenium Core. But do you know what the same-origin policy issue was?
Same-origin policy is rules which enforce the web application security model. According to the same-origin policy, the web browser will allow JavaScript codes to access elements on the web page, if and only if both the JavaScript and web page being tested are hosted from the same domain. Selenium Core being a JavaScript-based testing tool was handicapped for the same reason that it could not test every web page.
But when Selenium RC came into the picture, it rid testers of the same-origin policy issue. But, how did RC do that? RC did that by using another component called the Selenium RC server. So, RC is a tool that is a combination of two components: Selenium RC server and Selenium RC client.
Selenium RC server is an HTTP proxy server, designed to “trick” the browser into believing that Selenium Core and the web application being tested are from the same domain. Hence, there is no stopping the JavaScript code from accessing and testing any web site.
Even though Selenium RC was a major hit, it had its own share of problems. The major one being the time taken for executing tests. Since the Selenium RC server is the middle man in the communication between the browser and your Selenium commands, test executions are very time-consuming. Besides the time factor, RC’s architecture is also slightly complicated.
This architecture involves first injecting Selenium Core into the web browser. Then Selenium Core will receive the instructions from the RC server and convert it into a JavaScript command. This JavaScript code is responsible for accessing and testing the web elements. If you look at the image below, you will get an idea of how RC works.

To overcome these problems, Selenium WebDriver was developed. WebDriver is faster because it interacts directly with the browser and there is no involvement of an external proxy server. The architecture is also simpler as the browser is controlled from the OS level. The below image will help you understand how WebDriver works.

Another benefit with WebDriver is that it supports testing on the HTML Unit driver which is a headless driver. When we say a headless driver, it refers to the fact that the browser has no GUI. RC on the other hand does not support the HTML Unit driver. These are some of the reasons why WebDriver scores over RC.
Before learning the concepts of Selenium, you should have a basic understanding of Java or any other object-oriented programming language. Languages supported by Selenium include C#, Java, Perl, PHP, Python and Ruby. Currently, Selenium Webdriver is most popular with Java and C#.
Let’s now move ahead and learn about “browser elements” in the next part of this Selenium tutorial where I will tell you what are these elements and how testing happens on these web elements.
Elements are the different components that are present on web pages. The most common elements we notice while browsing are:
Testing these elements essentially means we have to check whether they are working fine and responding the way we want it to. For example, if we are testing text boxes, what would you test it for?
If we are testing an image, we might want to:
Similarly, operations can be performed on each of the elements mentioned earlier. But only after the elements are located on the web page, we can perform operations and start testing them right? So, the next topic, I will be covering in this Selenium tutorial blog is element locator techniques.
Every element on a web page will have attributes (properties). Elements can have more than one attribute and most of these attributes will be unique for different elements. For example, consider a page having two elements: an image and a text box. Both these elements have a ‘Name’ attribute and an ‘ID’ attribute. These attribute values need to be unique for each element. In other words, two elements cannot have the same attribute value. Elements can have the same value for ‘Class Name’.
In the example considered, the image and text box can neither have the same ‘ID’ value nor the same ‘Name’ value. However, there are some attributes that can be common for a group of elements on the page. I will tell you which are those attributes later, but before that let me list down the 8 attributes using which we can locate elements. Those attributes are ID, Name, Class Name, Tag Name, Link Text, Partial Link Text, CSS and XPath.
Since the elements are located using these attributes, we refer to them as ‘Locators’. The locators are:
By looking at the syntax above, you might have realized locators are called inside methods. So, before going any further, you need to learn all the other methods, browser commands and functions that can be used to perform operations on the elements.
From this section of the blog onwards, you will be having a lot of fun because there will be less theory and more codes. So be prepared, and keep your Eclipse IDE open with the required Selenium packages installed.
To start testing a web page, we need to first open a browser, then navigate to the web page by providing the URL right? Check out the below piece of code, where I have replicated the same. Firefox browser will first be initiated and then it will navigate to Facebook’s login page.
package seleniumWebDriver;
import org.openqa.selenium.WebDriver;
import org.openqa.selenium.firefox.FirefoxDriver;

public class WebDriverClass
{
public static void main(String[] args)
{
System.setProperty("webdriver.gecko.driver", "files/geckodriver.exe");
WebDriver driver = new FirefoxDriver();
driver.get("https://www.facebook.com/");
driver.getTitle();
driver.quit();
}
}
import org.openqa.selenium.WebDriver; is a library package which contains the required class to initiate the browser loaded with a specific driver.
import org.openqa.selenium.firefox.FirefoxDriver; is a library package which contains the FirefoxDriver class needed to start FirefoxDriver as the browser initiated by the WebDriver class.
System.setProperty(“webdriver.gecko.driver”, “files/geckodriver.exe”); – This command notifies the run-time engine that the Gecko driver is present in the specified path. After Firefox 35, we need to download the Gecko driver for working with WebDriver. In case you want to test on chrome, then you have to download ChromeDriver, which is a .exe file and specify it’s path in this line of code. We have to do it similarly in case of other browsers also.
WebDriver driver = new FirefoxDriver(); – This command is used to initiate a new Firefox driver object.
driver.get(“https://www.edureka.co/”); – This method is used to open the specified URL.
driver.getTitle(); – This command gets the title of the tab that is currently open in the browser.
driver.quit(); – This command closes the browser driver.
But, what if you want to navigate to a different URL and then do testing? In that case you can use the navigate.to() command as shown in the below code snippet. If you then want to come back to the previous page, then you can do that by using navigate.back() command. Similarly for refreshing the current page, you can use navigate.refresh() command.
driver.navigate().to(“https://www.edureka.co/testing-with-selenium-webdriver”);
driver.navigate().refresh();
driver.navigate().back();
If you want to maximize the size of browser window, then you can do that by using the code in the snippet below.
driver.manage().window().maximize();
In case you want to set a custom size for the browser window, then you can set your own dimensions as shown in the below code snippet.
Dimension d = new Dimension(420,600);
driver.manage().window().setSize(d);
Now that you know most of the basics, let’s go to the next topic in this Selenium tutorial blog. Let’s try to find an element on the web page and then perform any operation that is possible.
I’m pretty sure, you all have Facebook accounts. So, let me show you how to log into Facebook bypassing the credentials from the code itself.
There are two text fields in the Facebook login page, one for Email/Phone and another for Password. We have to locate these two elements, pass the credentials to those elements and then find the third element: Login button which needs to be clicked on.
Look at the screenshot below. It is the screenshot of Facebook’s login page.

If you Inspect (Ctlr + Shift + i) this page, then you will get the same window in your browser. Then, under Elements, list of all the elements present on the page and their attributes will be displayed. There are three portions highlighted in the above screenshot. The first highlighted element is an email text field, the second is the password text field and the third is the Login button.
If you can recall, I mentioned earlier that these elements can be located using element locator techniques. Let’s use it to locate these elements and send the field values.
This is the syntax for finding the element: driver.findElement(By.id(“xxx”));
For sending it values, we can use the method sendKeys(“credentials“);
For clicking on a button, we have to use the method click();
So, let’s get started with finding the element and performing an operation on it. The code for it is in the below snippet.
driver.findElement(By.name("email")).sendKeys("xxx@gmail.com");
driver.findElement(By.name("pass")).sendKeys("xxxxxx");
driver.findElement(By.id("u_0_q")).click();
In line #1, we are identifying the Email element by its unique ‘Name’ attribute and sending it the EmailID.
In line #2, we are identifying the Password element by its unique ‘Name’ attribute and sending it the password.
In line #3, we are locating the Login button element by its unique ID and clicking on that button.
Adding just these lines of code might not be enough. That is because of the dynamics of the page, it might not respond immediately and by the time the page loads, WebDriver will get terminated and throw a timeout exception error. This issue might not happen in Facebook’s page because it is fast, but will most likely happen in any other E-Commerce site and other dynamic web sites.
To overcome this problem, we need to use an advanced technique. We need to request our WebDriver to wait after the page is accessed and after it loads completely, we need to locate the elements and then perform actions.
In case you want your WebDriver to wait until all the elements load in a web page and then close the browser, then we can achieve that by using driver.wait() method or Threads.sleep() method. However, if you are writing more advanced code, then you should use Implicit waits or Explicit waits. In the next blog of this Selenium tutorial series, I will explain the concept of wait conditions. But for our case, the below commands are enough.
driver.wait(5000);
// or use this:-
Thread.sleep(5000);
But, while working with wait conditions, remember to import this library:
import java.util.concurrent.TimeUnit;
We do it because, the class for wait and its related methods will be present in this library.
The entire code I explained, is present in the below code snippet.
package seleniumWebDriver;
import org.openqa.selenium.WebDriver;
import org.openqa.selenium.firefox.FirefoxDriver;
import java.util.concurrent.TimeUnit;

public class WebDriverClass
{
public static void main(String[] args)
{
System.setProperty("webdriver.gecko.driver", "files/geckodriver.exe");
WebDriver driver = new FirefoxDriver();
driver.get("https://www.facebook.com/");
driver.manage().window().maximize();
driver.getTitle();
driver.navigate().to(“https://www.edureka.co/testing-with-selenium-webdriver”);

driver.navigate().back();
driver.navigate().refresh();
driver.wait(5000);
// or use
// Thread.sleep(5000);

driver.findElement(By.name("email")).sendKeys("xxx@gmail.com");
driver.findElement(By.name("pass")).sendKeys("xxxxxx");
driver.findElement(By.id("u_0_q")).click();

driver.quit();
}
}
When you replace the credentials with your actual email and password and execute this code, then Facebook will open in a new window, enter your credentials and login to your account.
Voila! You have successfully logged in, which means your complete code executed completely.
I have used the ID and Name attributes for locating elements. You can in fact use any other locator for finding the elements. XPath is the most useful and important of the locator techniques. But, as long as you can find even one of the attributes and use them for locating elements, you should be good. You can see the below video delivered by an industry expert, where she has shown all the above mentioned features of Selenium WebDriver with hands-on.
My next blog in this Selenium tutorial series is about how TestNG can be used along with Selenium WebDriver. I urge you to read it because it talks about how the limitations of WebDriver (test case management and report generation) can be overcome by using TestNG.
If you encounter any problem while executing the code present in this blog or if you have any other queries, then put them in the comments section below and we will get back to you right away.
If you wish to learn Selenium and build a career in the testing domain, then check out our interactive, live-online Selenium Certification Training here, which comes with 24*7 support to guide you throughout your learning period.
Got a question for us? Please mention it in the comments section of this What is Selenium article and we will get back to you or join our Selenium Training in Manchester today.
| Course Name | Date | |
|---|---|---|
| Selenium Certification Training Course | Class Starts on 29th April,2023 29th April SAT&SUN (Weekend Batch) | View Details |
| Selenium Certification Training Course | Class Starts on 15th May,2023 15th May MON-FRI (Weekday Batch) | View Details |
| Selenium Certification Training Course | Class Starts on 27th May,2023 27th May SAT&SUN (Weekend Batch) | View Details |


 REGISTER FOR FREE WEBINAR
  Thank you for registering Join Edureka Meetup community for 100+ Free Webinars each month JOIN MEETUP GROUP


Thanks for sharing this information it is very helpful and clear all dout about selenium.keep it up
Its really great site to visit, I really want to appropriate you for your great posting especially about selenium…
Thanks,For Sharing Valuable information.Selenium With C#
Thanks for sharing such a valuable information best selenium training institute in hyderabad
hi, nice information is given in this blog. Thanks for sharing this type of information, it is so useful for me. nice work keep it up.
for more info contact us on : http://www.supreetsolutions.com/
The content u speak about selenium is very useful and helps to learn more thank you http://seleniumtraining.co.in/
Nice blog, learnt many things about hadoop…
Hey Prabhat, we are glad to have helped you in learning Hadoop. Do subscribe and stay connected with us. :)